Little Known Questions About Procreate Brushes.
Table of ContentsThe Of Procreate BrushesSome Ideas on Procreate Brushes You Should KnowThe 8-Minute Rule for Procreate BrushesNot known Facts About Procreate BrushesAn Unbiased View of Procreate BrushesOur Procreate Brushes PDFsNot known Facts About Procreate Brushes
You can add brushes to Procreate by downloading and install. brush files onto your i, Pad. New Procreate brushes can be downloaded and install or purchased from a range of sites. To download and install Procreate brushes onto your i, Pad, you'll conserve them to the Data app and then "share" it to Procreate. Procreate is among the premiere illustration as well as mapping out applications for i, Pad.One of these functions is the capability to include new brushes. Right here's just how to include new brushes to Procreate. Prior to you can add brushes, you'll require to discover them.
, a website which specializes in attachments for a broad array of art apps. None of their brushes are cost-free, but they're top notch. Download and install the.
The Best Strategy To Use For Procreate Brushes
If they're in a. ZIP file, touch the. ZIP documents first to extract the brushes. You'll find your brand-new brushes in the Data app. William Antonelli/Insider Press and also hold your finger on a brush data, and after that choose. You'll include the brush to Procreate by "sharing" it.
It took me years to develop a collection of Procreate brushes that really felt natural and effortless, as well as I'm positive that you will locate them as simple to utilize as I do. These 10 brushes are a subset of 50+ brushes from my and also.
Satisfied Musicians "These brushes are remarkable! In all sincerity, I was getting so disappointed with attracting digitally because I really felt like I could not find the appropriate brushes for Procreate, but these have actually offered me inspiration again!" "Simply wan na thank these are the very best brushes I have ever used.
Procreate Brushes Can Be Fun For Everyone
They have a remarkable choice of presets nonetheless the fun is in making your very own Procreate brushes. Procreate deals outstanding control over the setups for their brushes.
Listed below, I have a link to my youtube video that covers this whole procedure where I stroll you via each category of settings - procreate brushes.
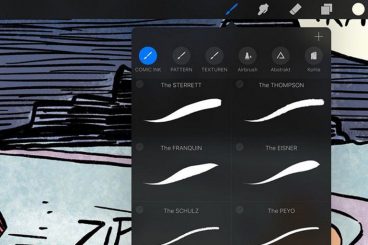
Every brush within Procreate can be located by accessing the at the top-right navigation bar in the program. Kinds of Brushes Procreate's brush library residences eighteen default brush types, such as: A collection of pencil, pastel, crayon, as well as chalk brushes. These are ideal for sketching your drawing out and adding refined tips of appearance.
Examine This Report about Procreate Brushes
These brushes include different tips of reasonable appearance to any kind of image and are best utilized after the sketching phase. For those who utilize Procreate for lettering and also calligraphy, this is the brush library to use. procreate brushes.
Perfect for providing any kind of facet of your illustration an air-brushed, slope glow. As opposed to the a lot more refined structure brushes, these brushes lean on the edge of patterned appearances. A lot like the Textures clean library, this collection of brushes is more abstract as well as formed. A go-to for many Procreate artists, this brush library includes the ideal degree of charcoal appearances to any type of drawing.
The Of Procreate Brushes
As soon as you click the, you can select from different brushes within the brush library simply as you can with the Brush device. Erasing Brushes Erasing what has actually been drawn is merely a component of the drawing process.
Exactly How advice to Adjust Default Procreate Combs By default, the Procreate application includes a substantial choice of pre-made brushes that musicians can utilize for various applications. In the Brush Library, you'll discover charcoal, paint, impacts, and also water brushes.
How Procreate Brushes can Save You Time, Stress, and Money.
Replicate brush. Step 2: Edit Stroke Residences and Taper Once you've found a brush to customize, click on the brush preview to open up the.
Each area has sliders that can be used to personalize the appearance of the stroke as well as its habits. Spacing, Jitter, and Fall Off are all buildings that influence the spacing of the resource picture utilized to create the stroke.
This device supports your stroke look and also is optimal when making use of Procreate for hand-lettering objectives. This menu shows sliders that affect the look of the taper at the end of the brush stroke.
The smart Trick of Procreate Brushes That Nobody is Talking About
applies the taper impact to a knockout post the overall brush. The staying sliders customize the taper quantity, dimension, opacity, stress, as well as suggestion. Explore these sliders as well as test out the personalized settings by you could check here drawing within the Attracting Pad. Step 3: Modify Shape Resource Feature Brushes in Procreate start as a solitary shape.
The panel consists of sliders to edit the scatter and rotation of the brush form. A higher worth of Scatter develops a textured brush, while a reduced worth of Scatter develops a streaked result.
Step 4: Readjust Grain Impacts In Procreate, the brush stroke acts as a strand of particular shapes. Assume of the brush's grain as a paint roller, as the brush is attracted on the canvas, the grain modifications in direction and dimension.